08.03.2026
Today I built the posts page frame with brown background, I extracted some images that I’ll use.
Now the next part is to build ‘projects’ page I have some things to remember about:
Minigame adventure map inside my blog
16.03.2026
I built the simple path and separate js files folder.
The next part is the arrow and hero directions and moving
1.
-
I think I could base it like from last path point the ‘X’. I’d take the coordinates of ‘X’ and then move by one into hero direction and set the image of the arrow based on the relation;
next arrow - current arrow
To figure out which arrow to draw, we have to look at the “In Vector” (where we came from) and the “Out Vector” (where we are going).
we create a “lookup table.” We create a key based on where the path enters the tile and where it exits.
For example, if you move right into a tile, and then move right out of it, your key is"1,0_1,0". We link that key to the specific index of the straight horizontal arrow on your sprite sheet. -
The arrows up and down are not in center. I need to fix it.
-
When changing the resolution the path arrows are stuck in same position far from hero.
- I need to implement this function with relation to the hero image, it also needs to change direction depending on the path so it is correlated.
- The difficult part will be to obtain hero images from the sprite-sheet where hero images are having weird sizes about 94 x 64. It’d be perfect to have it 64 x 64.
The Claude did it in a single prompt. It resolved all images from weird align to 64x64 fro every image.
- Also there are only assets for 5 directions of hero. I need to add 3 rest. I know two approaches to do that: Extend the image by manually inverted textures in photo editor, if hero goes in direction that there is no image, take opposite image and rotate it 180 degrees. (Do the same for every piece of animation).
JavaScript makes wonders with that task
.translate .scale and everything works fine.
-
To move the hero user needs to click same grid two times. The cursor during that should change;
default cursor, horse, and running horse.
Just on canvas horse when executing then no cursor- For now the cursor works as for whole html canvas but later I need to distinguish between kind of object to interact. Even now when hovering on hero there should be default cursor.
- The hero needs to move on every tile passed with some delay like 200 ms.
- The last difficult part will be to implement animation of hero moving. So I need to put 8 images in a single move ongoing 200 ms.
Map based experience
Objects and interactions.
Propositions of making code clean and tidy
I can propose a concrete cleanup plan file-by-file. I’ll quickly re-read the current src/game/.js so the suggestions match your latest code exactly, then I’ll give you a tidy refactor roadmap.
Best Cleanup Proposals
-
1. Start the loop only after initialization succeeds.
src/game/main.js currently starts requestAnimationFrame(gameLoop) before asset validation/loading. Move loop start to the end of the try block so update/draw never runs on half-initialized state. -
2. Split startup into small functions.
In src/game/main.js, extract: getCanvasAndContext() readConfig() loadAssets(game, config) setupEvents(canvas, game, draw) This reduces cognitive load in startGame and makes errors easier to isolate. -
3. Keep update pure game logic and draw pure rendering.
You already mostly do this. Keep it strict: no DOM/config/image loading inside update/draw. This makes behavior predictable and easier to test. -
4. Introduce a small debug logger helper.
In src/game/main.js and src/game/path.js, replace raw console.log(…) spam with: const DEBUG = false; debugLog(…args) wrapper Then you can enable logs in one place without editing many files. -
5. Make resize behavior explicit and safe.
In src/game/map.js, resizeCanvas currently recenters hero every resize. Usually better is: center hero only once on first init preserve hero position on later resizes This avoids surprising position jumps. -
6. Define game constants in one file.
Move values like moveSpeedMs, frame assumptions, and tile sizes into a constants.js (or extend map.js constants) for one-source-of-truth tuning. -
7. Clean input flow for preview/confirm.
src/game/input.js is good now after your fix. Next tidy step: extract getTargetCell(event, canvas) helper extract isSameCell(a, b) helper That removes repetition and improves readability. -
8. Improve path rendering API clarity.
In src/game/path.js, drawPath has many args and mixed responsibilities. Consider: passing game object instead of many parameters, or passing one object { ctx, pathArray, pathImage, tileSize, gridVisible, heroCell } Also remove debug logs from render hot path. -
9. Add simple JSDoc types.
Because this is plain JS, add small JSDoc on the game state shape and key functions. You’ll get better IntelliSense and fewer mistakes without switching to TS. -
10. Standardize style/lint automatically.
Add ESLint + Prettier in wandering-wind so naming, quotes, spacing, and dead code cleanup become automatic instead of manual.
Objects on map
22.03.2026
Objects in the HOMM3 mini game
Objectives
- Implement a 2.5D depth sorting system for game objects and heroes
- Separate visual, logical, and interaction footprints for precise object behavior
- Create a three-pass rendering pipeline to handle shadows and depth
- Develop a passability matrix to manage collisions and pathfinding logic
- Build a toggleable debugging grid to visualize physical object boundaries
- Enable interactive object triggers using specific entry tiles
Instructions
Link to original
- Create an
ObjectLibraryto store blueprints for images, offsets, and footprints.- Define a specific “Anchor Point” (Pivot) for the hero and every object.
- Separate shadow assets from main object sprites to avoid rendering errors.
- Implement a three-pass rendering loop, starting with the ground terrain.
- Draw all shadows in the second pass relative to the object’s anchor point.
- Compile a
renderListcontaining the hero and all active map objects.- Sort the
renderListbased on the Y-coordinate of each entity’s anchor point.- Draw entities in the sorted order to maintain the 3D depth illusion.
- Generate a 2D Passability Matrix that mirrors the map’s grid dimensions.
- Update the matrix by marking tiles within an object’s “Logical Footprint” as non-walkable.
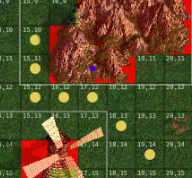
- Create a toggleable debug mode to draw red squares over blocked tiles.
- Upgrade the pathfinding algorithm (like A*) to navigate around blocked matrix tiles.
- Define “Interaction Tiles” where the hero can trigger specific object events.
- Program the hero to automatically target an object’s interaction tile when clicked.
- Use relative offsets for all footprints so they move in sync with the object.
Now Im on the part of developing the objects on the map. There are many fundamental rules that objects should follow to provide good interaction of game, hero with objects.
The object footprint approach rules:
-
The object image has its “visual footprint” that take overall image size, with its shadow, often unncecesserily large.
-
The object image has the “logical footprint” this is the part of the image that when cursor is hovering it can display info about the object. It should contain visual footprint but without the shadow and transparent tiles.
-
The last part is the “Interaction footprint” this is only one tile from object that when step on by hero it shows content of the object. Wherever cursor clicks on the logical footprint it provides path to the interaction footprint.
Objects rules:
-
The hero can’t step onto “logical footprint”.
-
Hero must be put behind the “logical footprint”
-
The hero can step only on “interaction footprint” some object doesn’t have it, it means hero can’t interact with them, but anyway some information can be showed when user hover it (hover the logical footprint)
-
Hero must be on the top when stepping on interaction footprint.
-
Objects can’t override on theirs logical footprint, but they can on the visual footprint.
-
Some objects are on top and some behind. The usual rule is that interactive objects are on the top and only logical are in the background, but I didn’t dive this topic deeper so there can be exception.
-
Hero can’t run through object the path should be calculated around the “logical footprint”
Rules of code:
-
Code for whole objects.js feature should be easy to add new objects.
-
It should have simple construction without uneeded debugging, error detections constructs.
-
For every object there should be implemented the debugging grid that will show the tiles of the visual, logical, interaction footprint.
-
The debugging grid and object should be connected that when moving object the debugging grid should move also automaticly.
-
Moving objects on canvas should be easy for user. In that way he could arrange the map with objects in his own unique ways.
Tell me in overall if this plan is possible to maintain and what is required, what is the best approach to achive this feature. Tell me what I forget that I need to consider. Is the way of thinking as visual, logical and interaction footprints efficient or it should be provided in better way? What are the approaches used in game developing to resolve those problems?
Map Objects & Z-Sorting Implementation Plan
Phase 1: Data Architecture & The Y-Sort Rendering
Goal: Get a static object on the screen so the hero can walk visually “behind” and “in front” of it.
- 1. Create the Object Library
- Create a new file:
objects.js. - Define the
ObjectLibrarydictionary to store blueprints (image sources, offsets, footprints). - Create a
createMapObject(type, gridX, gridY)helper function to generate object instances.
- Create a new file:
- 2. Initialize Game State
- Add an empty array
game.mapObjects = []to your main game state. - Pre-load object images and shadow images inside your startup sequence (just like you did for grass/hero).
- Manually push one test object (e.g., a tree or hut) into
game.mapObjectsfor testing.
- Add an empty array
- 3. Upgrade the Render Pipeline (Three Passes)
- Update
draw()to Pass 1: Draw Terrain. - Update
draw()to Pass 2: Loop throughgame.mapObjectsand draw only their shadows usingshadowOffsetX/Y. - Update
draw()to Pass 3: Create an emptyrenderListarray. - Push the Hero into
renderListwith theiranchorY(pixelY). - Push all Map Objects into
renderListwith theiranchorPixelY. - Sort the
renderListbyanchorY(lowest to highest). - Loop through
renderListand execute their draw functions.
- Update
- 4. Verify Phase 1: Move the hero up and down past the object to ensure they overlap the shadow correctly, but get hidden by the object’s top.
Phase 2: Physics & The Debug Grid
Goal: Create the hidden mathematical grid that tracks where objects physically sit, and visualize it.
- 1. Build the Passability Matrix
- Add
game.passabilityMatrix = []to your game state. - Create a function
generatePassability()that builds a 2D grid matching your map size, defaulting all tiles totrue(walkable).
- Add
- 2. Stamp the Logical Footprints
- Inside
generatePassability(), loop throughgame.mapObjects. - For each object, loop through its
logicalfootprint array. - Calculate the absolute grid coordinates (Object X + Footprint X) and set those matrix tiles to
false.
- Inside
- 3. Create the Debug Visualizer
- Add a
game.debugMode = falseboolean. - Add a keyboard listener (e.g., pressing ‘D’) to toggle
debugMode. - In the
draw()loop, ifdebugModeis true, loop through the passability matrix. - Draw a semi-transparent red square (
rgba(255, 0, 0, 0.4)) over every tile markedfalse.
- Add a
- 4. Verify Phase 2: Toggle debug mode and verify the red squares perfectly align with the base of your test object.
Phase 3: Pathfinding Upgrades
Goal: Stop the hero from walking through the red squares.
- 1. Prevent Direct Clicks on Obstacles
- Update your
mousedownlistener: If the clickedtargetCellisfalsein the Passability Matrix, ignore the click (or play an error sound).
- Update your
- 2. Upgrade the Pathfinding Algorithm
- Open
path.js. - Update
calculatePath()to accept thepassabilityMatrixas an argument. - Optional but recommended: Swap your basic line-of-sight math for an A* (A-Star) or Breadth-First Search algorithm that checks the matrix to route around
falsetiles.
- Open
- 3. Verify Phase 3: Click behind the object. The yellow path arrows should route around the red debug squares.
Phase 4: Interaction Footprints
Goal: Allow the hero to step on a specific tile to trigger an object’s logic.
- 1. Define Interaction Tiles
- Ensure your
ObjectLibraryblueprints have aninteractionfootprint defined (e.g.,{x: 0, y: 1}).
- Ensure your
- 2. Update the Hero Footprint Tracker
- Inside
checkTileInteraction(logicalX, logicalY)(built previously), check if the hero’s new tile matches any object’s absolute interaction tile.
- Inside
- 3. Trigger the Event
- If there is a match, fire the object’s event (e.g.,
console.log("Visited Windmill!")).
- If there is a match, fire the object’s event (e.g.,
- 4. Smart Targeting (The HoMM3 Click)
-
Update the
mousedownlistener: If the user clicks an object’s Logical footprint, automatically change thetargetCellto that object’s Interaction footprint so the hero walks to the entrance.All this Phase 4 feature is clearly described step by step in HOMM3 Dialog boxes on canvas.
-
Phase 5: Map Editor Capabilities (Optional/Future)
Goal: Allow dragging and dropping objects to build the map.
- Add an “Editor Mode” toggle.
- Update
mousedown: If Editor Mode is on, clicking a logical footprint selects the object. - Update
mousemove: If an object is selected, update itsgridXandgridYto match the mouse cursor. - Recalculate
anchorPixelX/Ydynamically as the mouse moves. - Call
generatePassability()immediately when the mouse is released to update the physics grid.
How in final version should I add objects on canvas? Like previously in main.js with command:
game.mapObjects.push(createMapObject(“university”, 40, 3));
Addidtional things to add:
- Transaprency on hero when behind the object, hero must be visible through the objects with some transparency
- Mouse behave weirdly when switching cursors between horse and base cursor, probably because of the different execution point pixels
- Some objects like hero, towns or enemies should have special cursors. Also towns should be interactive through all object but the enter point for hero should be one.
- The end arrow should be always overwritten on all objects. Maybe even all arrows should be always on top.
- Interactive tiles block path-through but allow landing on. They are treated as blocked as long hero is directly next to interactive tile.
- Delete the unnecessary 90 degrees arrows just operate on diagonal and straights arrows.
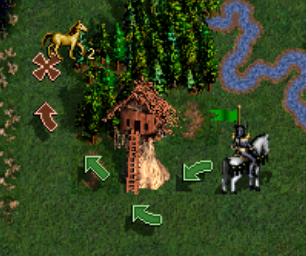
Like in original game. - When changing resolution The hero always holds to be visible inside the canvas no matter of resolution. Generally it’s good but in that way we can move hero to any position on map without touching path algorithm, also we can drop the hero inside objects what is the obvious bug.
- Editor mode to easily move objects on map
- Labels for objects id and coordinates in object debugging
Moving Logic to CMS
Phase 1: The Local Data Engine Refactor
-
Step 1: Create the Data Source
-
Create a new file in your project:
src/data/map-data.json. -
Write a JSON array containing 2 or 3 of your existing objects.
-
Data to include:
id,title,x,y,spriteSrc, andurl(the page it should open).
-
-
Step 2: Fetch the Data in Astro
-
Open the Astro page that holds your canvas (e.g.,
src/pages/index.astro). -
In the frontmatter (between the
---lines at the top), import that JSON file directly. -
Example:
import mapData from '../data/map-data.json';
-
-
Step 3: Build the HTML Bridge
-
Locate your
<canvas>tag in the HTML. -
Add a custom data attribute to pass the JSON from the server to the browser.
-
Example:
<canvas id="gameCanvas" data-objects={JSON.stringify(mapData)}></canvas>
-
-
Step 4: Refactor the JavaScript Class
-
Inside your
<script>tag, delete your specific object classes (likeclass Chestorclass Tavern). -
Create one single, generic class called
class MapObject. -
Update the
constructorto accept a singledataparameter, and assignthis.x = data.x,this.sprite.src = data.spriteSrc, etc.
-
-
Step 5: Read the Data into the Engine
-
In your JavaScript, write a few lines of code to select the canvas and read the
data-objectsattribute. -
Parse the string back into a JavaScript array using
JSON.parse().
-
-
Step 6: Generate the World
-
Instead of manually creating variables (e.g.,
const myChest = new Chest()), use an array map. -
Loop through your parsed JSON data and push a
new MapObject(data)into a globalworldObjectsarray for every item found in the JSON.
-
-
Step 7: Update the Game Loop
-
Go to your
animate()ordraw()loop. -
Remove all the individual
myChest.draw()andmyTavern.draw()calls. -
Replace them with a single loop:
worldObjects.forEach(obj => obj.draw(ctx));.
-
-
Step 8: The Great Cleanup
-
Verify the canvas is drawing the objects exactly as they were before.
-
Delete all the old, hardcoded variables and logic that you are no longer using.
-